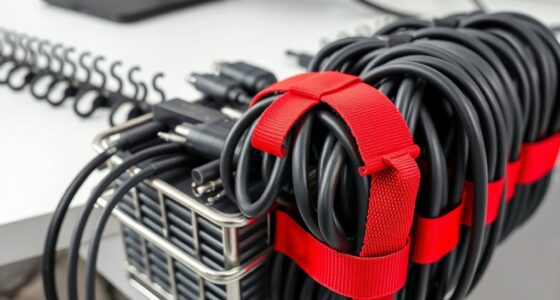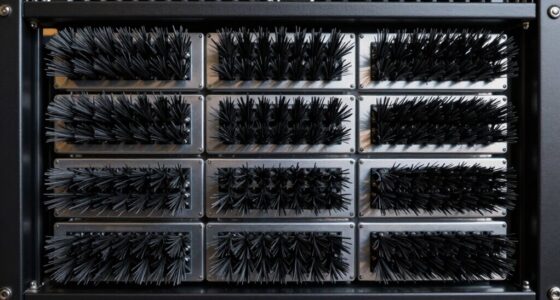

This guide shows you how to select and use network cable management tools to organize Ethernet cables at a desk, in a small office, or around a network rack. You will plan the route, separate data cables from power cords, secure the cables without pinching them, and label both ends so you can identify connections later. It is for beginners who can safely access their equipment; allow about 30 minutes for a small setup or up to 2 hours for a larger group of cables.

Get networking and server gear delivered free — and shop member deals
- Fast, free delivery on millions of items
- Access to Prime Big Deal Days deals on October 6–7
- Prime Video, Amazon Music and more included

Hixeto Network Cable Management Comb
- ✔ Material: Nylon resin
- ✔ Maximum cable diameter: 1/4 inch (6.35 mm)
- ✔ Cable capacity: Up to 48 cables

Hixeto Network Cable Comb for Cables up to 0.36 Inches
- ✔ Compatible cable diameter: Up to 0.36 inch (9.15 mm)
- ✔ Capacity: Up to 24 Cat 6a/7 cables
- ✔ Material: Nylon resin
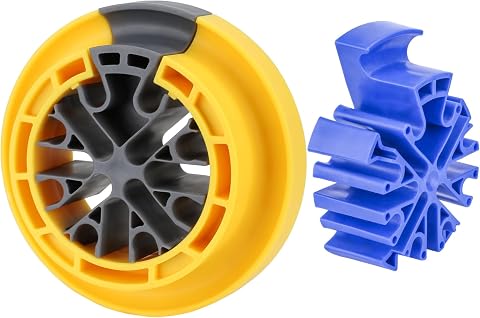
Wire Comb Kit for Network Cable Management
- ✔ Compatible cables: Cat 5, Cat 5e, Cat 6, Cat 6a, Cat 7, network, plenum, control, speaker, alarm, PC, and PSU cables
- ✔ Maximum cable diameter: 0.36 inch (9.15 mm)
- ✔ Material: Nylon resin
Difficulty: Beginner | Time: 30 minutes to 2 hours, depending on cable count and layout
What You’ll Need
Tools & Materials:
- Ethernet cable ties or reusable hook-and-loop straps
- Cable labels or a label maker with suitable tape
- Cable clips, adhesive mounts, a raceway, or rack cable managers suited to the installation
- Tape measure and marker
- Scissors or a flush cutter for trimming ties, if needed
- Flashlight for dim spaces
Knowledge:
- Ability to identify the router, switch, patch panel, and devices connected by the cables
- Basic familiarity with following an Ethernet cable from one endpoint to another
Gather enough straps, labels, and routing hardware for the cable count and route length. Check that adhesive mounts are rated for the surface and expected load. For a rack, use cable-management panels or rack-safe accessories that fit its dimensions. Do not buy staples or tight plastic ties for Ethernet runs: they can crush the cable. If cables pass through walls, ceilings, or fire-rated barriers, follow applicable building and fire-stopping requirements or ask a qualified installer.
Hixeto Network Cable Management Comb
The first Hixeto comb earns our overall spot because it offers the lineup’s clearest high-capacity use case: up to 48 cables, provided each cable is no wider than 1/4 inch (6.35 mm). That makes it the most straightforward option when the job is to bring a substantial group of compatible network cables into order. Its open design lets us place or remove cables from the comb without threading each one through a closed opening, which is useful when a bundle changes during installation.Compared with the two wider Hixeto options, this model prioritizes cable count over diameter clearance. The 0.36-inch comb is the more suitable choice for thicker Cat 6a/7 cables, while the Wire Comb Kit names a wider range of non-network wires. But neither alternative provides this model’s stated 48-cable capacity. The tradeoff is decisive: thicker cables may not fit, so we should measure the cable itself rather than assume that a category label guarantees compatibility.Nylon resin construction and finger grooves support sorting and pulling the comb through a bundle, but the product details do not give a warranty duration. It is also a comb, not a fastening system; we will still need an appropriate method to secure the organized run. Choose it for dense, slimmer bundles, and skip it if your cables approach or exceed the diameter limit.
Pros:
- Stated capacity of up to 48 compatible cables
- Open design allows cables to be added or removed without threading
- Works with Cat 5, Cat 5e, Cat 6, and other compatible cables
- Finger grooves support pulling and sorting
Cons:
- Maximum cable diameter is limited to 1/4 inch
- Warranty duration is not specified
Best for: Installers and home-network owners organizing many Cat 5, Cat 5e, or Cat 6 cables that measure no more than 1/4 inch in diameter.
Not ideal for: Anyone working with thicker Cat 6a/7 cable, cables above 1/4 inch, or a job requiring a stated warranty.
Bottom line: Choose this comb for the largest stated bundle capacity, as long as every cable fits within its 1/4-inch limit.
“Choose this comb for the largest stated bundle capacity, as long as every cable fits within its 1/4-inch limit.”
Hixeto Network Cable Comb for Cables up to 0.36 Inches
Where the 48-cable comb favors density, this Hixeto model favors more diameter clearance. It accepts cables up to 0.36 inch (9.15 mm) and specifies capacity for up to 24 Cat 6a/7 cables. That is a clearer match for a bundle of thicker network lines than the first pick, whose 1/4-inch maximum rules out cables that exceed its narrower opening.The tradeoff is that its stated capacity is lower: up to 24 rather than 48 cables. For a thicker run, that may be the right compromise, but buyers with a large bundle of slim cable should consider the first Hixeto instead. Its open-loading construction also appears in the other two picks, so it is not a unique reason to choose this model; the case for it rests on the specific combination of a 0.36-inch limit and a stated Cat 6a/7 count.Nylon resin and finger grooves are intended to support sorting and adjustment. The description also says it works with Cat 6 and other cable types within its diameter limit, but we should not treat the broader compatibility wording as a guarantee for every cable construction. Measure first, particularly when cable jackets are bulky. This is the most targeted choice for thicker network lines, not the best fit for maximum bundle count or an assortment of non-network wiring.
Pros:
- Accepts cables up to 0.36 inch (9.15 mm) in diameter
- Stated capacity of up to 24 Cat 6a/7 cables
- Open loading makes adding or removing cables straightforward
- Finger grooves help with pulling and sorting
Cons:
- Lower stated capacity than the 48-cable Hixeto model
- Still limited to cables no wider than 0.36 inch
Best for: People managing a moderate-sized bundle of Cat 6a/7 or other compatible network cables up to 0.36 inch in diameter.
Not ideal for: Buyers prioritizing the highest stated cable count, or those whose cables exceed 0.36 inch in diameter.
Bottom line: This is our practical pick when thicker Cat 6a/7 cables matter more than maximizing the number of cables in one comb.
“This is our practical pick when thicker Cat 6a/7 cables matter more than maximizing the number of cables in one comb.”
Wire Comb Kit for Network Cable Management
The Wire Comb Kit is the broadest-fit option on paper: its listed compatibility spans network, plenum, control, speaker, alarm, PC, and PSU cables, as well as Cat 5 through Cat 7. Like the second Hixeto comb, it accommodates cable diameters up to 0.36 inch (9.15 mm). That makes it a stronger candidate than the 1/4-inch model when a workspace contains more than standard network cable or includes thicker lines.Its distinction is versatility, not a demonstrated capacity advantage. Unlike the second Hixeto, which states a capacity of up to 24 Cat 6a/7 cables, the kit description does not say how many combs are included and does not provide a bundle capacity. We should therefore avoid choosing it on the assumption that “kit” means multiple pieces or that it will manage a particular number of cables. For a clearly defined Cat 6a/7 bundle, the second Hixeto is easier to plan around; for mixed wiring, this one has the wider stated compatibility list.The open-loading design, nylon resin body, and finger grooves support repositioning and sorting. The description says it is designed to reduce wear while organizing cables, but the maximum diameter still applies, and the item weight is higher than the other listed combs. This pick makes most sense when cable variety matters more than a documented cable count. If we need a known number of tools or a capacity figure before starting, we should favor one of the more specific alternatives.
Pros:
- Lists compatibility with network and several other wire categories
- Supports cables up to 0.36 inch (9.15 mm) in diameter
- Open-loading design makes repositioning easier
- Finger grooves support pulling and sorting
Cons:
- The description does not specify how many combs are included
- No cable capacity is stated
- Maximum cable diameter remains limited to 0.36 inch
Best for: People sorting mixed installations that combine network lines with compatible control, speaker, alarm, PC, or PSU cables.
Not ideal for: Buyers who need a confirmed number of combs in the package or a stated cable capacity for planning a defined bundle.
Bottom line: Choose this option for mixed cable types, but confirm the package contents if the number of combs matters to your project.
“Choose this option for mixed cable types, but confirm the package contents if the number of combs matters to your project.”
As an Amazon Associate we earn from qualifying purchases.
Before You Start
Take a photo of the existing setup and note which ports each cable connects to before moving anything. Avoid unplugging active connections unless you have permission and can tolerate an outage. Keep network cables away from power cords where practical; when they must cross, cross at roughly a right angle. Plan a route with gentle curves, enough slack to open doors or pull equipment forward, and access to ports, fans, and service panels. Never exceed the cable maker’s bend-radius guidance. If you cannot find it, do not force a tight bend or fold the cable sharply.
Step-by-Step Instructions
Step 1: Map the connections and route
Identify both ends of every cable and record its source and destination, such as “switch port 4 to office printer.” Trace each cable by hand or use a compatible cable identifier if the route is unclear. Decide where each bundle will run, where cables need to branch, and where equipment must remain movable. Measure the route and mark proposed clip or manager locations before attaching hardware.
Separate groups by destination or function rather than collecting every cable into one oversized bundle. Leave enough slack at endpoints for normal access, but avoid loops that can catch on doors or block airflow. Check that your planned route does not cover labels, ventilation openings, power switches, or equipment controls.
Tip: Do not pull on a cable to identify it; check its connector and port instead. If tracing a cable requires disconnecting it, confirm that the interruption is approved.
Check: You have a route plan and can name the source and destination of each cable you intend to manage.
Step 2: Choose tools that fit the cables and location
Use reusable hook-and-loop straps for bundles that may change, and use labels at both ends for identification. Choose clips or adhesive mounts for a small number of cables along a desk or wall. Use a raceway when you need to conceal and protect a run. In a rack, use horizontal or vertical cable managers suited to the rack and the cable path.
Check each product’s size and fit before installing it. A strap should close around the bundle without compressing the cables. A clip should hold the cable without gripping the connector or jacket too tightly. Choose adhesive hardware only for clean, dry surfaces compatible with its adhesive. Avoid metal ties, staples, and ordinary tight zip ties for securing Ethernet cable.
Tip: Keep a few spare hook-and-loop straps and labels available. Reusable supplies make later additions and repairs easier.
Check: Your selected hardware supports the cable type, bundle size, surface, and expected future changes.
Step 3: Label both ends before bundling
Write a short, unique identifier on a label and place it near each end of the cable, where it can be read without covering the connector or blocking a port. Put the same identifier at both ends, then record what it connects in your port map or equipment notes. For a group of similar cables, label them individually rather than relying on color alone.
Use labels that adhere to the cable jacket and remain readable in the installation environment. Wrap or apply them according to the label maker’s directions; do not place adhesive across a connector latch or a section that bends frequently. If equipment is currently in service, label one cable at a time and verify its endpoints before moving to the next.
Tip: Use a consistent naming pattern, such as room-device-port, and keep the written port map with the equipment.
Check: Both ends of each cable carry matching identifiers, and your notes show the corresponding connection.
Step 4: Install the routing hardware
Clean and dry surfaces before fitting adhesive mounts, following the product directions for application and cure time. Position clips or mounts along the planned route with enough space to support the cable without forcing it into a sharp turn. For rack equipment, install the cable manager in its intended rack position and fasten it with compatible hardware.
Feed cables through a raceway or manager without pulling the connectors against edges. Keep the route clear of moving parts, hot surfaces, sharp edges, and ventilation paths. If drilling or fastening near a wall, check for hidden wiring and pipes first. Do not attach cable hardware to a surface that cannot safely support the cable load.
Tip: Adhesive strength can be reduced by dust, paint texture, moisture, or cold. Use mechanical fastening where the product and surface call for it, and never rely on an unsuitable adhesive for a heavy or overhead run.
Check: The hardware is secure, the route is accessible, and no cable is forced around an edge or obstruction.
Step 5: Secure cables with room to move
Place cables into the clips, raceway, or cable manager, then group related runs with reusable straps. Close each strap just firmly enough to keep the bundle together; the cables should still move slightly when you adjust them. Keep Ethernet cables loosely grouped and do not twist, kink, crush, or tightly coil them. Leave a gentle service loop where a device or rack component needs to move.
Keep bundles small enough to identify and service. Do not cover cable labels with straps, and avoid filling a raceway beyond its stated capacity. Trim only excess strap material, not the cable jacket, and leave no sharp tie end pointing toward a cable or person.
Tip: If a bundle looks flattened or individual cables cannot shift at all, loosen the strap or split the bundle.
Check: Cables stay on the planned route but retain their shape, labels remain visible, and service slack is available.
Step 6: Check connections and revise the layout
Follow each cable from its label to its destination and compare it with your port map. Confirm that connectors are fully seated and that no cable has been pulled partly out of a port. Check the link indicators on the connected devices, then test a representative connection or each endpoint if the work involved moving cables. Confirm that fans, vents, doors, and rack drawers can operate normally.
Correct any tight bend, strained connector, blocked airflow, or route that makes equipment difficult to service. Replace a damaged cable rather than hiding damage inside a bundle. Update your notes if you changed a route or port assignment.
Tip: A link light is a useful quick check, but it does not prove that every network service works. Test the device or connection in the way your network normally uses it.
Check: Cables match the port map, connectors are seated, expected link indicators are present, and connected devices operate normally.
Common Mistakes to Avoid
- Tightening plastic ties until the bundle is rigid. — Use reusable hook-and-loop straps for Ethernet bundles and close them loosely enough that the cables are not compressed.
- Bundling cables before identifying their endpoints. — Trace and label each cable at both ends before securing it; record the matching identifier in a port map.
- Routing cables across vents, hinges, or sharp edges. — Inspect the full route and check that equipment can open, move, and ventilate before securing the bundle.
- Relying on adhesive mounts on dusty, damp, or unsuitable surfaces. — Check surface compatibility, clean and dry it as directed, and use appropriate mechanical fastening when required.
Troubleshooting
Problem: An adhesive mount falls off after cables are placed in it.
Solution: Remove the load, clean and dry the surface, and follow the mount’s application and curing directions. Replace it with a compatible mount or a suitable screw-fastened option if the surface or cable weight is not appropriate for adhesive.
Problem: A device loses its network connection after cable routing.
Solution: Check that the cable is connected to the original ports, that both connectors are fully seated, and that the cable has not been pinched or sharply bent. Compare the cable labels with your port map. Test with a known-good cable if the link does not return.
Problem: The bundle blocks a port, fan, or rack door.
Solution: Loosen the straps and reroute the bundle through a different manager or clip position. Split a large bundle by destination and leave access around vents, controls, and movable equipment.
Problem: Cable labels peel off or cannot be read.
Solution: Use labels rated for the cable surface and environment, apply them to a clean, dry jacket, and keep them clear of frequently flexed areas. Replace unclear labels and update the port map at the same time.
What Success Looks Like
The finished setup has identifiable cables with matching labels at both ends, a route that follows the planned path, and bundles held without crushing or sharply bending the cables. Ports, ventilation, equipment controls, and service access remain clear. The port map matches the actual connections, and connected devices show expected link status and operate normally.
Next Steps
Keep the port map with the router, switch, or rack documentation, and update it whenever you move or replace a cable. Check straps, adhesive mounts, and labels after adding equipment or moving furniture. Remove unused cables only after confirming that both ends are disconnected and the cable is no longer needed. If a run passes through building spaces, crosses fire barriers, or requires a permanent installation, follow local requirements or consult a qualified network installer.
Frequently Asked Questions
Can I use zip ties to organize Ethernet cables?
Reusable hook-and-loop straps are generally easier to adjust and less likely to compress cables. If you use a tie, do not tighten it enough to deform the cable, and avoid sharp cut ends that can catch or injure.
Do I need a separate cable-management tool for a home router?
Usually not. A few reusable straps, clear labels, and compatible clips or a small raceway can organize a home setup. Choose hardware based on the surface, cable count, and whether you need to move the equipment.
Should Ethernet cables be kept away from power cables?
Keep them on separate routes where practical, especially along long parallel runs. If they must cross, cross at roughly a right angle. Follow equipment and local requirements for separation in permanent installations.
How much slack should I leave?
Leave enough gentle slack to reach ports and move equipment for service without pulling on connectors. Avoid large loose loops that snag, and do not coil or bend cable more tightly than its manufacturer permits.
Should I label both ends of every network cable?
Yes. Matching labels make it much easier to identify a connection from either end, particularly in a rack or a group of similar cables. Record the identifier and port assignment in a simple map.
Fall Picks
fall essentials
As an affiliate, we earn on qualifying purchases.