
TL;DR
A closet can serve as a functional vocal booth if you focus on placement, absorption, sealing gaps, and ventilation. Moving gear into a separate room is the most effective way to eliminate noise, but if kept in a closet, proper treatment and airflow are key.
Ever tried recording vocals or streaming in a tiny closet? It’s more doable than you think — if you know the tricks. Most people jump straight to foam panels, thinking that’s all it takes. Acoustic dampening and placement. But the real magic lies in where you place your mic, how you treat reflections, and whether your space can breathe.
This guide breaks down the essentials — from making the closet quiet enough for recordings to avoiding heat buildup that could fry your gear. If you want a DIY setup that sounds professional without breaking the bank, keep reading. Your closet might just be your new favorite studio.
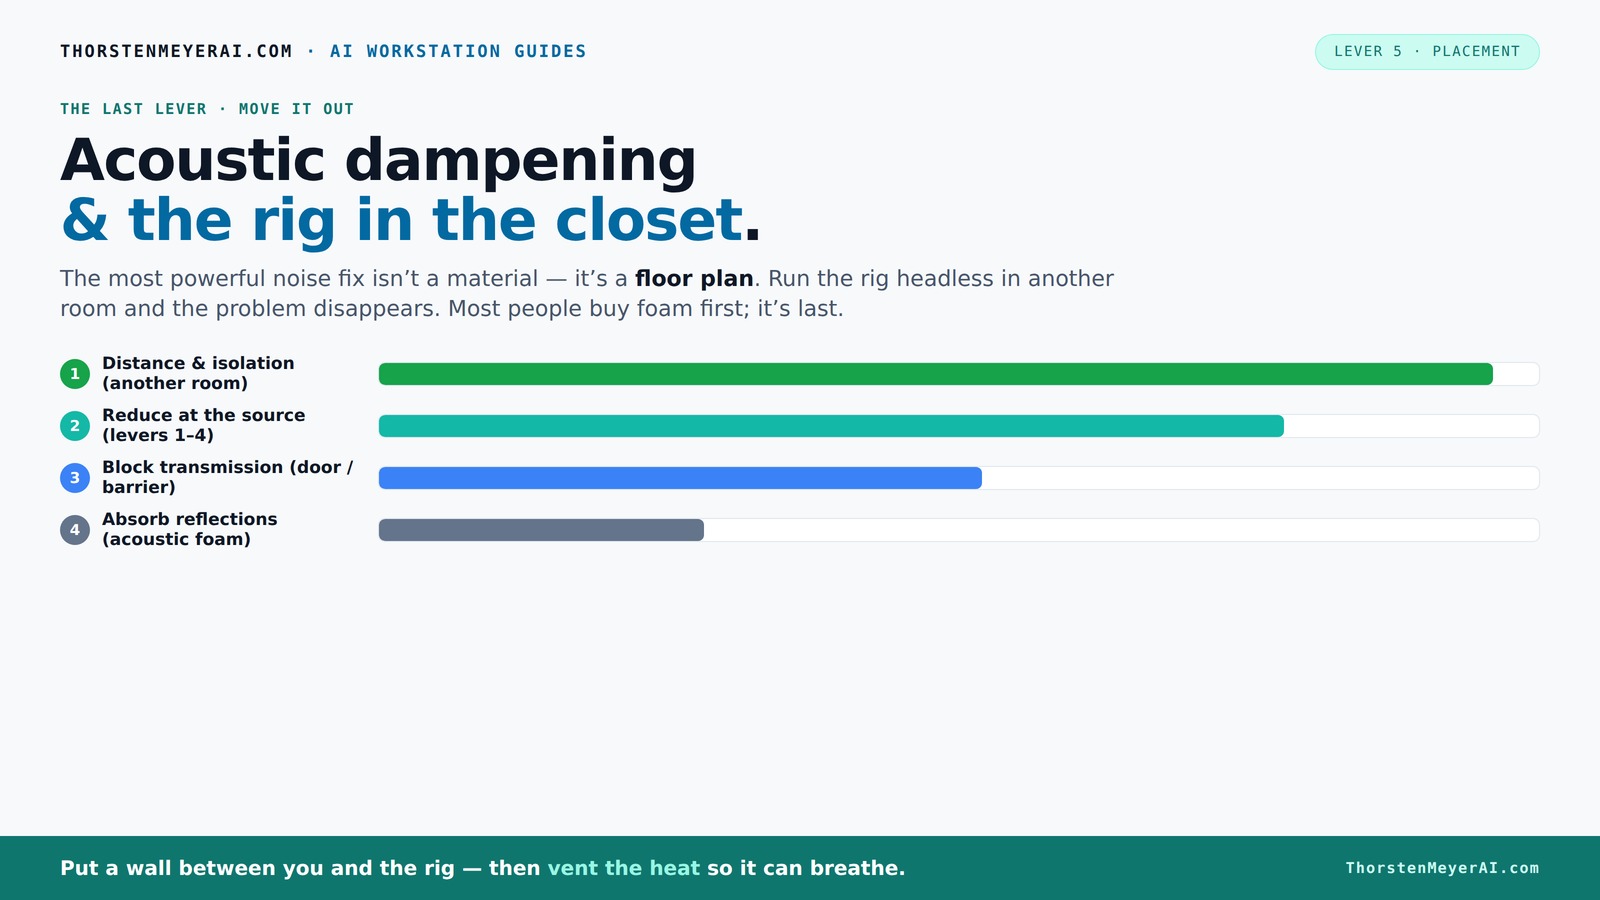
Acoustic dampening
& the rig in the closet.
The most powerful noise fix isn’t a material — it’s a floor plan. A rig you can’t hear because it’s in another room beats any amount of foam. Tap the approaches in Part 1 to see what actually works.
(another room)
(levers 1–4)
(door / barrier)
(acoustic foam)
Contain the noise, not the heat
Key Takeaways
- Prioritize moving your rig into another room for the biggest noise reduction.
- Treat reflection points behind the mic, ceiling, and side walls with absorption materials.
- Seal gaps around doors and vents to contain sound and prevent leaks.
- Use bass traps in corners to control low-frequency build-up in small spaces.
- Ensure your closet has proper ventilation to prevent heat buildup and gear damage.

Focusound 52 Pack Acoustic Foam Panels 1" x 12" x 12" Sound Proof Foam Panles Soundproofing Noise Cancelling Wedge Panels for Home Office Recoding Studio with 300PCS Double-Side Adhesive
- Soundproofing Design: Triangular grooves for noise absorption
- Includes Adhesive Tape: 300pcs double-sided adhesive for easy installation
- Easy Shape Recovery: Reforms after soaking in water
As an affiliate, we earn on qualifying purchases.
As an affiliate, we earn on qualifying purchases.
The Big Difference: Acoustic Dampening vs. Soundproofing — Know What You Need
Acoustic dampening and soundproofing serve different purposes. Dampening reduces echoes and reflections inside your space. Soundproofing stops sound from leaking out or coming in from outside.
Inside a closet, dampening is about softening the reflections that cause hollow, boxy vocals. Soundproofing involves sealing gaps around doors and seams to keep noise from sneaking in or out.
For a closet studio, focus on dampening first — covering hard surfaces with blankets or foam. Then, seal gaps around the door and vents to lock in your sound.

SD SODOCT 24 Pack Self-Adhesive 12" X 12" X 1.2" Egg Crate Soundproof Wall Panels for Studio, Room Acoustic Treatment Foam, Sound Absorbing Foam Black
- Self-Adhesive Design: Easy to install without extra tape
- High Sound Absorption: NRC up to 0.86 for effective noise reduction
- Versatile Wall Compatibility: Suitable for various wall surfaces
As an affiliate, we earn on qualifying purchases.
As an affiliate, we earn on qualifying purchases.
Can a Closet Really Work as a Vocal Booth? Yes — Here’s How to Make It Sound Good
Absolutely. Small, enclosed spaces like closets can produce surprisingly good sound. The key is to control reflections and low frequencies, which often cause that boxy, boomy vocal sound.
Imagine singing in a cardboard box versus a well-treated closet. With the right placement and absorption, your voice will be clearer, warmer, and more professional.
Start by choosing the right microphone — a cardioid condenser works well because it isolates your voice from background noise. You can learn more about microphone types and setup. Position it about 6-12 inches from your mouth, slightly off-center to avoid plosives.
Then, treat the reflection points — behind your mic, the ceiling, and side walls. Cover hard surfaces with blankets or foam, focusing on the largest reflective areas first.

Aokeo Microphone Isolation Shield, Foldable Mic Shield with Triple Sound Insulation, Reflection Filter with 3/8" and 5/8" Mic Threaded Mount for Recording Studio, Podcasts, Singing, and Broadcasting
- Sound-proof Foam Front: Eliminates noise for clearer vocals
- Ventilated Metal Back Panel: Reduces sound reflection and echo
- Large Size 23.2" x 11" x 2": Suitable for vocals and instruments
As an affiliate, we earn on qualifying purchases.
As an affiliate, we earn on qualifying purchases.
Where to Place Your Microphone for the Best Sound in a Tiny Space
The placement of your mic makes or breaks your sound. In a small closet, aim to minimize reflections and room noise. Position the mic about 6-12 inches from your mouth, pointing slightly downward or to the side.
Use the 'reflection-free zone' principle: place the mic so that the nearest reflective surfaces are at a 90-degree angle, not directly behind or to the sides.
Example: If your closet has a window or hard shelf behind you, move your mic to face away from these surfaces. Use a boom arm or mic stand that allows flexible positioning.
Test by recording short clips, then listen for echo or room noise. Adjust until you find a warm, direct sound.

8" Room to Room Air Transfer Fan for Quietly Circulating Air, Reversible Airflow Design, 320 CFM Programmable Through Wall Fan, Durable Build Quality, 10 Speed Thru Wall Exhaust Fan for Closet,Laundry
- Quiet, Powerful Air Circulation: Circulates 320 CFM quietly between rooms
- Reversible Airflow: Easily switch airflow direction with buttons
- Temperature Sensor: Displays current temperature and auto-operates
As an affiliate, we earn on qualifying purchases.
As an affiliate, we earn on qualifying purchases.
Where to Put Acoustic Panels and Absorbers for Maximum Effect
Start by targeting the main reflection points: behind the mic, the ceiling, and side walls. Covering 20-30% of the wall surface with absorbers can dramatically cut echo and improve clarity. For more tips, see acoustic treatment strategies.
Use foam panels, blankets, or DIY solutions like hanging a quilt. Focus on the areas where sound bounces back from your voice path.
For example, place a foam panel directly behind your mic and additional panels on the ceiling and side walls at the reflection points. Don’t forget the door edges — sealing gaps with a moving blanket or weatherstripping helps contain sound.
If your closet has corners or parallel walls, add bass traps or foam wedges in the corners to control low-frequency buildup.
Do You Need Bass Traps in a Small Closet? Yes — Here’s Why
Bass traps are a must in tiny spaces. Low frequencies tend to build up in corners, creating that boomy, hollow sound. Small closets amplify this problem because of their dimensions and reflective surfaces.
Adding bass traps in the upper corners of your closet — or even DIY versions using thick blankets or foam wedges — can smooth out the low end and give your vocals more body. Learn more at bass trap placement.
For example, a beginner using a standard foam panel might notice a boxy sound. Adding a couple of bass traps in the corners can improve clarity and warmth, making your recordings sound more professional.
How Much Coverage Is Enough? Cover 20-30% of Walls to Cut Echo
Research suggests that covering around 20-30% of reflective surfaces can significantly reduce echo in small rooms. In a closet, start with panels on the main reflection points and expand if needed.
For example, if your closet is 4x6 feet, covering about 2-3 square feet on each wall at reflection points can make a noticeable difference.
In a vocal booth, focus on the ceiling and side walls first. You can add more coverage or bass traps later for a richer sound.
Remember: the goal is to tame reflections, not deaden your space completely.
Sealing Doors and Gaps: Keep Sound In and Out
Gaps around your closet door are like open windows for sound. Sealing these is crucial for containment. Use weatherstripping, draft stoppers, or hanging blankets over the door.
For example, a simple DIY solution is attaching a moving blanket with hooks or a tension rod. This not only blocks sound but also adds absorption.
Pay special attention to the door edges and any vents. Covering small openings with foam or acoustic sealant keeps your recordings clean and quiet.
Floor and Surface Treatments to Stop Reflections
Hard floors reflect sound like a mirror. Adding a rug or carpet in your closet reduces these reflections and prevents a boxy tone.
For example, placing a thick rug or an old carpet in front of your mic area softens the sound and improves warmth.
Similarly, covering shelves, side surfaces, or even the closet door with blankets or foam reduces secondary reflections.
This simple step makes your recordings sound more natural and less hollow.
Ventilation and Heat: Keep Your Closet Rig Cool and Safe
Putting a high-powered machine inside a closet traps heat, which can cook your gear. Good airflow is non-negotiable. Read about ventilation solutions. Use passive vents or quiet exhaust fans to move hot air out.
For example, a small duct or a quiet PC fan pulling hot air out through a vent keeps temperatures manageable. If you’re sealing the closet door, add a small vent or duct with a sound baffle to prevent noise leaks.
Consider using an [AIO cooler](https://thorstenmeyerai.com/liquid-vs-air-cooling-inference-rig/) to help move heat efficiently out of the system, especially for continuous workloads.
Check temperatures regularly. If your closet gets too warm, your GPU will throttle, and your noise levels will spike.
Frequently Asked Questions
Can a small closet really serve as a good vocal booth?
Absolutely. With proper placement, absorption at reflection points, and sealing gaps, a closet can produce warm, clear recordings. The key is managing reflections and low-frequency buildup, which small spaces tend to amplify.How much acoustic treatment do I need in a closet?
Start with covering around 20-30% of the main reflection points — behind the mic, ceiling, and side walls. You can add bass traps and more coverage over time if you notice echo or boomy low end.Do I need to seal my closet door for good soundproofing?
Yes. Sealing gaps around the door with weatherstripping or hanging blankets can dramatically reduce sound leaks. For better isolation, consider adding a thick curtain or acoustic panel around the door edges.What’s the biggest mistake in closet studios?
Overlooking ventilation and heat buildup. A sealed, poorly ventilated closet can overheat and damage gear or cause fans to roar, defeating the purpose of quiet recording.Can I use foam panels alone, or do I need other treatments?
Foam panels help reduce echo, but they won’t stop low-frequency buildup or sound leaks. Combine them with sealing gaps and adding bass traps for a balanced, professional sound.Conclusion
Your closet can be a surprisingly effective studio with the right balance of placement, treatment, and airflow. Focus first on moving the gear away from your ears, then treat the main reflection points and seal gaps. The result? Clear, warm vocals and a quiet workspace that doesn’t sacrifice your gear’s health or your sanity.
Remember: the best soundproofing is often just a matter of thinking creatively about where and how your gear lives. So, set up your closet, breathe some life into it with sound treatment, and start recording like a pro — no expensive studio needed.